Coffee roasting is both an art and a science. While the roasting process transforms the beans into the dark, aromatic gems we know and love, it all starts with how you prepare the raw green coffee seeds. Coffee beans before roasting are green and have a verdant smell. They are the raw form of this beloved beverage.
After 18 years behind the barista counter, I’ve learned the ins and outs of how to ready green beans for optimal roasting. Follow these steps from my article “how to prepare coffee beans for roasting” and you’ll be amazed at how much better your homemade grilled coffee turns out.
To prepare coffee beans for roasting, start by selecting the type of coffee you want to roast, such as espresso or light roast. Next, place the green beans in a popcorn popper or popcorn maker and roast them for about 12 hours. Once the roasting process is complete, cool the beans in a metal colander and remove any remaining chaff. Finally, grind and brew the roasted beans to enjoy a freshly roasted glass of coffee.
Takeaways
- Select high quality, specialty grade green seeds and remove any defects
- Allow beans to de-gas for 24-48 hours before roasting
- Sort beans by size and blend varieties to create custom flavor profiles
- Store beans properly in cool, dark conditions and roast within 2-4 weeks
- Proper preparation is crucial for evenly roasted beans and great tasting coffee
One of the key takeaways from learning how to grill coffee beans at home is the ability to have control over the flavor profile. Using a coffee roaster, you can experiment with different roast levels, from light to dark. Roasting your own coffee beans allows you to enjoy the freshness of each batch and ultimately brew the best coffee possible. Additionally, investing in a quality grinder will ensure you can achieve the perfect cup of coffee, and understanding the stages of roasting, such as the first and second crack, helps you achieve desired results.
How to prepare coffee beans for roasting?
To prepare coffee beans for roasting, start by deciding on the desired roast level – light, medium, or dark. If using a popcorn machine or home roaster, ensure the machine is clean and ready. Place the beans in the machine and wait for the first crack, indicating the beans are roasted to a light or medium level. For a darker roast, wait for the second crack. Once roasted, allow the beans to cool, then grind to your desired consistency for brewing.

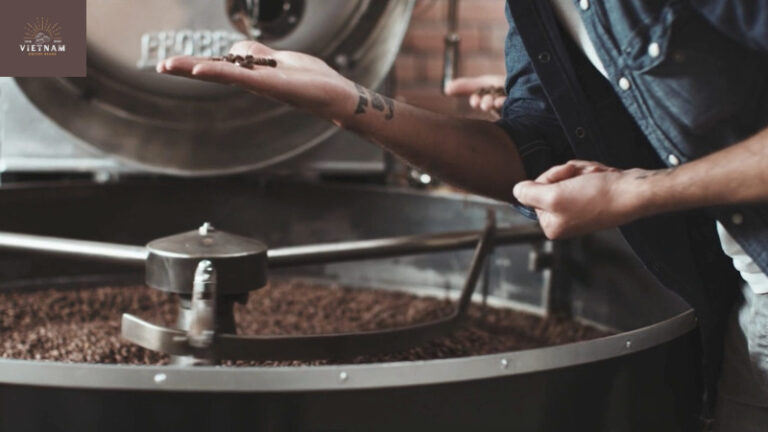
In a coffee shop, the barista carefully grinds a quantity of beans and places them in a pan. After a fresh roast of 30 seconds, the medium roast coffee beans begin to crack. The barista listens intently for the first crack, then continues roasting until the second crack for a light roast. This process is done in a purpose-built coffee roaster, ensuring the perfect flavor profile for the coffee company’s customers.
Roasting coffee beans at home has become increasingly popular among coffee enthusiasts. With the right roaster, you can control the level of roast and experiment with different flavor profiles. Roasting your own beans ensures freshness and allows you to tailor the coffee to your personal preferences. Whether you prefer a light, medium, or dark roast, a home roaster gives you the flexibility to create your perfect glass of coffee.
Selecting Green Coffee Seeds
The first step is choosing which green coffee seeds to purchase. As a general rule, I look for beans that are brightly colored and similar in size. Avoid beans with major defects. When sourcing beans, consider these factors:
- Variety – Select from popular coffee varieties like Arabica and Robusta
- Origin – Single origin vs blended beans from various regions
- Elevation – Higher elevation beans tend to be denser and more flavorful
- Processing – How the cherries are dried and milled impacts flavor
For the best results, I recommend buying from specialty coffee suppliers that note details like harvest date, variety, and altitude. The extra information helps ensure fresh, high quality beans.

When selecting green coffee seeds, it is important to consider the roast level desired. For those who prefer a dark roast, it is recommended to choose beans that have been roasted for around 30 seconds longer than desired. If you are planning to grill coffee beans at home, investing in a coffee roaster would be beneficial.
To determine the perfect roast, listen for the first crack, which indicates the beans have reached their desired level. When using a coffee roaster, you can adjust the amount of beans roasted at a time, making it a simple process for a coffee company or for personal use with an espresso machine.
Cleaning and Sorting the Beans
Once I have my raw beans, I inspect them closely and remove any debris like sticks, stones, defects, and dried cherry skins. It’s important to start with clean beans so these impurities don’t burn during roasting.
After cleaning, I sort the beans by size. Size sorting helps the beans roast evenly. If large and small beans are mixed, the smaller ones risk getting over roasted. I sort beans through wire mesh screens specific to size grades. It takes more time but it’s worth it.
Cleaning and sorting the beans is an essential step before roasting them in a coffee roaster. Different ways to grill coffee include using a roasting machine or roasting the beans at home. It is important to avoid burning the beans by carefully monitoring the roasting times. When roasting, the unroasted beans off-gas carbon dioxide, so it is crucial to turn on the exhaust fan to prevent any unwanted buildup.
De-Gassing the Beans
Freshly harvested coffee beans actually have a fair amount of carbon dioxide gas built up internally. This CO2 needs to be released before roasting so the beans don’t pop like popcorn!
I let my beans rest for 24-48 hours in a breathable container like a burlap sack. Over this period, the CO2 vents out naturally. You can speed up the de-gassing if you have a vacuum canister. Just don’t rush this important step. Coffee beans after roasting are at their best. The taste and aroma are intensified, providing a delightful experience for coffee lover

If you want to roast your own coffee like a pro, you can buy green coffee seeds and use a machine specifically made for popcorn to roast them. This way, you can achieve an even roast in just 12 minutes. Removing as much chaff as possible will result in a better cup of joe. Alternatively, you can support your local roaster and buy green beans from them. Either way, your dark roast of choice may earn you some serious coffee cred.
Blending Beans
With single origin beans, I roast each variety separately to accentuate its unique profile. But for more complex flavor, I like to blend beans from multiple origins and varieties.
Blending lets me combine different beans to create custom roasts. I can mix and match beans to highlight citrus flavors or add depth and richness.
When blending, I determine percentages based on taste preference. I also adjust for density so larger, denser beans don’t dominate. My blends have between two to five varieties of green beans.
| Bean Variety | Origin | Flavor Notes | Density | Percentage |
| Yirgacheffe | Ethiopia | Bright, citrus | Low | 15% |
| Sumatra Mandheling | Indonesia | Rich, earthy | High | 25% |
| Costa Rica Tarrazu | Costa Rica | Clean, fruity | Medium | 35% |
| Brazil Santos | Brazil | Bittersweet cocoa | Medium | 15% |
| Colombian Supremo | Colombia | Nutty, caramel | Medium | 10% |
Storing Beans Until Roasting
It’s important to store green coffee seeds properly after preparing them for roasting. Beans can quickly lose freshness and flavor if stored incorrectly.
I keep my beans in breathable burlap sacks or large airtight buckets. The storage container should allow gasses to vent but protect from light, air, and moisture.

Beans should be stored in a cool, dark place between 60-70°F. Direct sunlight and heat are enemies of freshness! I avoid storing beans near anything fragrant, as they’ll absorb odors.
For peak flavor, I try to roast beans within 2-4 weeks after the de-gassing period. But stored properly, they can last months. With different types of coffee roasting, there are options to explore and experiment with the perfect roast to suit individual preferences.
Key Things to Remember
Preparing green coffee beans takes a little extra effort but really pays off. Follow these keys steps:
- Select high quality, specialty grade beans and remove any defects
- Allow beans to de-gas for 24-48 hours before roasting
- Sort beans by size and blend varieties to create custom profiles
- Store beans in proper conditions and roast within 2-4 weeks
Proper preparation is crucial for evenly roasted beans and a better cup of coffee. Try these tips yourself and taste the difference! Read on “how to rest coffee after roasting” as I share my years of experience on the proper way to relax coffee for peak flavor and purity.
For coffee lovers who enjoy a dark roast, having the ability to grill coffee at home is a game-changer. Investing in a machine to roast your coffee allows you to experiment with different roasting levels and flavors. If you don’t have a roaster, you can still try roasting in a pan, although it may require more attention and precision. After roasting, it is important to let the beans degas before brewing, ensuring the best possible flavor. By roasting a pound at a time, you can enjoy a steady supply of freshly roasted café. To get started, simply find a reliable source to get green coffee beans from.
Frequently Asked Questions
How long does it take green coffee beans to de-gas?
Most beans de-gas within 24-48 hours. Allowing even more time is fine as long as they are stored properly.
Can I roast beans immediately after purchasing?
It’s best to let them de-gas first or you risk cracking and uneven roasting. Roasting too soon wastes money and great coffee!
Is there an ideal bean size for roasting?
Look for beans graded 16+ or 17/18. Sizes should be consistent. Avoid really small beans mixed with large.
Do I need special tools to sort beans by size?
You can purchase graduated wire mesh screens made specifically for bean sorting. Or improvise with strainers and colanders from your kitchen.
How important is storing beans in cool temperatures?
Very. Even short periods above 90°F speeds staling. Optimal is 60-70°F, no direct sunlight.
Conclusion
From sourcing to storage, properly preparing green coffee beans makes all the difference when roasting your own coffee. Take the time to select quality beans, clean, de-gas, sort, and store them according to these recommendations. You’ll be rewarded with fresh, flavorful, aromatic coffee worthy of any great cafe. Happy roasting!
Meta description: Learn how to expertly prepare green coffee beans for home roasting, including selection, cleaning, de-gassing, blending, and proper storage methods. A complete guide to pre-roast techniques for achieving the best cup of coffee.
Roasting Coffee Beans at home can be an extremely rewarding and delicious hobby. As someone who has been home roasting for over 10 years, I’m excited to share my tips, tricks, and guides to help you start roasting your own coffee and getting the most flavor out of those magical coffee beans.
Hope you get useful information from the article, If you want to read other article or want to read more about coffeebeans, please visit the website: vietnamcoffeebeans.com